Preview your Worklight Mobile Application in Simulators


In Using JQuery Mobile in Worklight 5 we have seen how we can start developing our mobile application with jQuery mobile library. In this article I am going to simulate and preview our company mobile application on different simulators.

First let's create "Worklight Hybrid Application" and add some markup to the main page;

<head>
<script src="js/jquery.js"></script>
<script src="js/jquery.mobile-1.3.0.min.js"></script>
</head>

<body>
 <!-- **************** Page ***************** -->
  <div data-role="page" id="page_main" >

           <!-- **************** Header ***************** -->
            <div data-role="header" data-theme="b">
                   <h2>MAK Informatics</h2>
            </div>

           <!-- **************** Content ***************** -->
            <div data-role="content" style="text-align: center; padding: 0 50 0 50">
                   <span style="text-align: center">Welcome to MAK Informatics</span>
                   <div style="margin: 0 10 0 10">
                      <ul data-role="listview" data-inset="true">
                          <li><a href="#page_company">Company</a></li>
                          <li><a href="services.html">Services</a></li>
                          <li><a href="contacts.html">Contacts</a></li>
                      </ul>
                  </div>
            </div>
          <!-- **************** Footer ****************** -->
           <div data-role="footer" data-position="fixed" data-theme="b" class="d-copyright-text">
                <span>Copyright&nbsp;&copy;&nbsp;2013, MAK Informatics</span>
            </div>
  </div>
</body>

Here's our application running on Chrome


Now let's see how we can simulate and preview our page on different Simulators.

The first one which comes handy is the Ripple Emulator which is an extension to Chrome browser. Go ahead and Install it as a Chrome extension;

Here we go. "Preview as a common resources" on Worklight Console and Enable Ripple Emulator to see your application in action as shown;


Worklight comes with it's on Mobile Browser Simulator. All you need to add Worklight Environment like Android or Blackberry and you would be able to simulate your application on Mobile Browser Simulator by clicking on your device platform


When you add Worklight Environment you have noticed that an Android Application is generated and added to your working set with the name of your project + application + android


This time we are simulating our generated Android application on Android Emulator which is used to simulates Android Native Applications. Let's try this on our html application


This is how we can preview our mobile applications in different ways

Using JQuery mobile in Worklight 5


jQuery mobile framework allows you to design a single highly-branded web site or application that will work on all popular smartphone, tablet and desktop platforms. You can download and find more about jQuery mobile here

For jQuery mobile to run properly you need a jQuery library which can be downloaded from here

To use a jquery mobile in Worklight project you need to follow the steps below;

1. First Create Worklight project in Eclipse as shown


2. Type Application name and add jQuery mobile library folder by checking "Add jQuery Mobile" checkbox as shown


3. Open your application.html file and add reference to the following files in <head>

       <link rel="stylesheet" href="css/jquery.mobile-1.3.0.min.css" />
       
       <script src="js/jquery.js"></script>
       <script src="js/jquery.mobile-1.3.0.min.js"></script>


We are all set. Now add following few markup to the html to see the jQuery mobile in action

<div data-role="page" id="page1">
    <div data-theme="a" data-role="header">
      <h3>jQuery Mobile Header</h3>
    </div>
    <div data-role="content">
   
      Content goes here!

    </div>
    <div data-theme="a" data-role="footer" data-position="fixed">
      <h3>Copyright stuff</h3>
    </div>
</div>

right click the application and "Build All and Deploy". Open Worklight Console and under application name click "Preview as Common Resources" to see the page in a browser.


Entity Framework Introduction

ADO.NET is a very strong framework for data access. ADO.NET has been around since many years and there are a lot of systems running over ADO.NET. Developers who are totally oblivious to the concept of ORMs will probably be asking "What is Entity Framework? What are the benefits of using it and is it an alternative to ADO.NET?"

Well, to answer the first question about what is Entity Framework, Entity Framework is an Object Relational Mapper (ORM). It basically generates business objects and entities according to the database tables and provides the mechanism for:
  1. Performing basic CRUD (Create, Read, Update, Delete) operations.
  2. Easily managing "1 to 1", "1 to many", and "many to many" relationships.
  3. Ability to have inheritance relationships between entities.
and to answer the second question, the benefits are:
  1. We can have all data access logic written in higher level languages.
  2. The conceptual model can be represented in a better way by using relationships among entities.
  3. The underlying data store can be replaced without much overhead since all data access logic is present at a higher level.
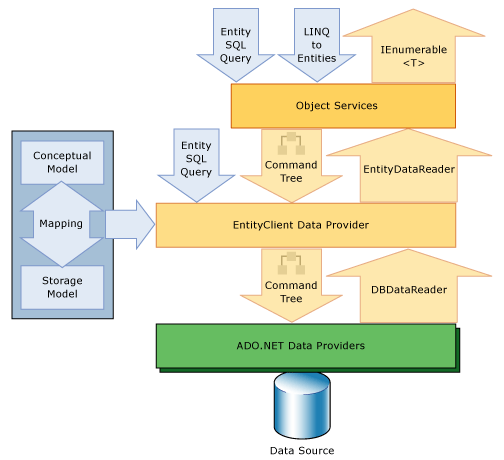
and finally, the last question that whether it is an alternative to ADO.NET, the answer would be "yes and no". Yes because the developer will not be writing ADO.NET methods and classes for performing data operations and no because this model is actually written on top of ADO.NET, meaning under this framework, we are still using ADO.NET. Below is the the architecture of Entity Framework


Entity Frameworks sits between your application and your database and takes care of  all the responsibilities of manipulating data on behalf of the developer by leveraging the power of ADO.Net. So that a developer can focus on querying and manipulating domain objects or entities in general. This makes application maintainable and extendable. It also automates standard CRUD operation (Create, Read, Update & Delete) so developer doesn’t need to write it manually.